Building a CRUD REST API with Spring Boot - May 20, 2022
A practical walkthrough of building a RESTful API using Spring Boot, covering core concepts like project setup, structure, configuration, and essential annotations for seamless CRUD operations.
Building a CRUD REST API with Spring Boot
If you’re just getting started with Spring Boot and want to learn how to build a CRUD REST API, you’re in the right place. In this guide, we’ll go step-by-step to build a simple user management API using the Spring ecosystem. You’ll learn about:
- Creating a Spring Boot project
- Structuring your app (Model, Repository, Service, Controller)
- Configuring it with application.properties
- Using common annotations like @RestController, @Service, @Entity, and more Let’s dive in!
🧱 Architecture Overview
Spring Boot follows a layered architecture, which helps keep the code organized:
- Presentation Layer: Exposes endpoints and handles HTTP requests (your controllers).
- Service Layer: Contains business logic (user management in our case).
- Data Access Layer: Interacts with the database (repositories).

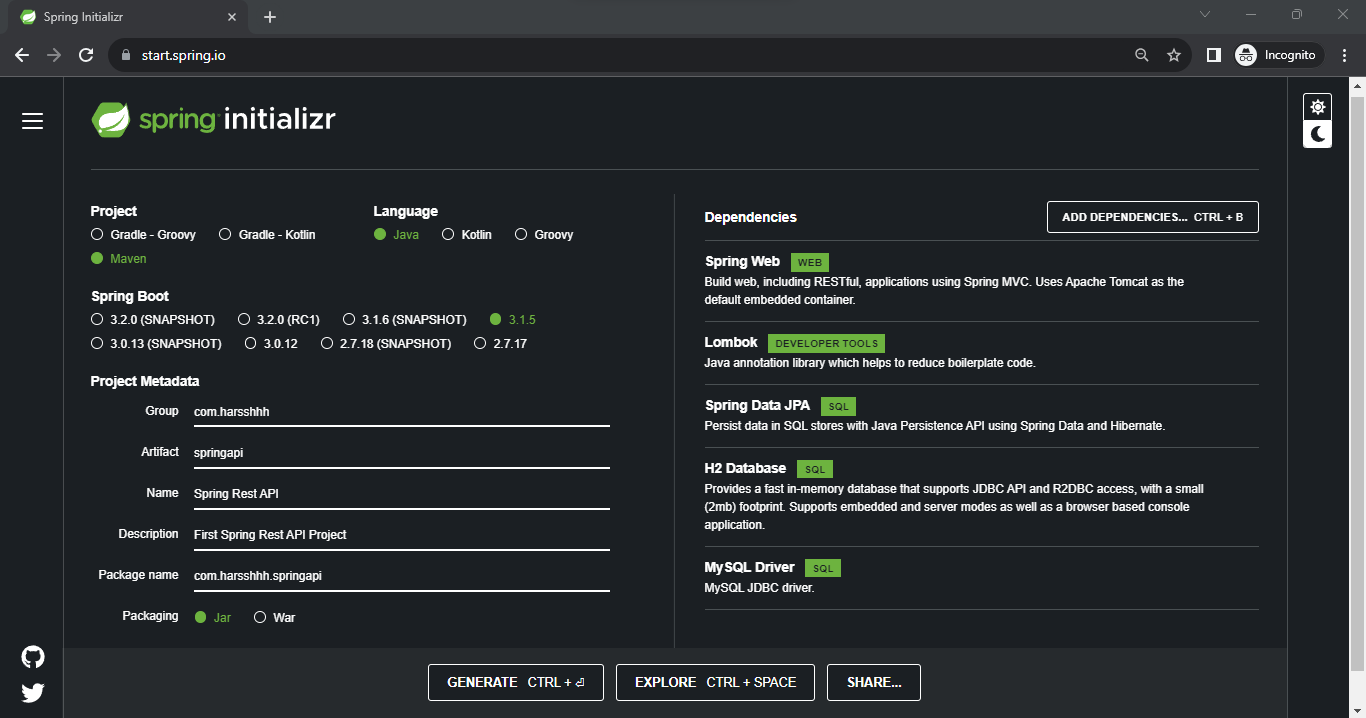
⚙️ Project Setup
We’ll use Spring Initializr to generate our project with the following settings:
- Java Version: 17
- Build Tool: Maven
- Dependencies:
- Spring Web
- Spring Data JPA
- Lombok
- H2 Database
- MySQL Driver (optional)
📄 application.properties – Your Configuration Hub
This file configures your application. It lives inside the src/main/resources/ directory.
Here’s what each line does:
spring.datasource.url=jdbc:h2:mem:user_db          # In-memory database URL
spring.datasource.driverClassName=org.h2.Driver    # H2 driver
spring.datasource.username=sa                      # Default username
spring.datasource.password=password                # Default password
spring.jpa.database-platform=org.hibernate.dialect.H2Dialect  # SQL dialect
spring.jpa.hibernate.ddl-auto=update               # Auto-create tables based on model
spring.h2.console.enabled=true                     # Enables the H2 web console

# Logs SQL queries in console
logging.level.org.hibernate.SQL=DEBUG
📦 Step 1: Create the Model (UserModel.java)
This class defines what a “User” looks like. It also maps to a database table via annotations.
@Data  // Lombok annotation to auto-generate boilerplate (getters, setters, etc.)
@Entity  // Marks this class as a JPA entity (mapped to a DB table)
public class UserModel {
    @Id
    @GeneratedValue(strategy = GenerationType.SEQUENCE)  // Auto-increment userId
    private Integer userId;
    private String firstName;
    private String lastName;
    private String email;
    private Integer age;
}
🗃️ Step 2: Repository Layer (UserRepository.java)
The DAO (Data Access Object) that extends JpaRepository, giving you CRUD methods for free.
public interface UserRepository extends JpaRepository<UserModel, Integer> {
}
No need to define findAll(), save(), or deleteById() — Spring does it for you!
🧠 Step 3: Service Layer (UserService.java)
The brain of your app — all logic lives here.
@Service  // Tells Spring to treat this as a service component
public class UserService {
    @Autowired
    private UserRepository userRepository;

    public List<UserModel> getAllUser() {
        return userRepository.findAll();
    }

    public String insertUser(UserModel user) {
        try {
            userRepository.save(user);
            return "Successfully Inserted";
        } catch (Exception e) {
            return "Error Inserting";
        }
    }

    public String deleteUser(Integer id) {
        try {
            userRepository.deleteById(id);
            return "Successfully Deleted";
        } catch (Exception e) {
            return "Error Deleting";
        }
    }

    public String updateUser(UserModel updateUser, Integer id) {
        try {
            UserModel existingUser = userRepository.findById(id)
                .orElseThrow(() -> new RuntimeException("User not found"));

            existingUser.setFirstName(checkNull(updateUser.getFirstName(), existingUser.getFirstName()));
            existingUser.setLastName(checkNull(updateUser.getLastName(), existingUser.getLastName()));
            existingUser.setAge(checkNull(updateUser.getAge(), existingUser.getAge()));
            existingUser.setEmail(checkNull(updateUser.getEmail(), existingUser.getEmail()));

            userRepository.save(existingUser);
            return "Successfully Updated";
        } catch (Exception e) {
            e.printStackTrace();
            return "Error Updating";
        }
    }

    private <T> T checkNull(T newData, T existingData) {
        return (newData == null) ? existingData : newData;
    }
}
🌐 Step 4: Controller Layer (UserController.java)
Exposes REST endpoints to the outside world.
@RestController  // Combines @Controller + @ResponseBody (JSON by default)
public class UserController {
    @Autowired
    private UserService userService;

    @GetMapping("/alluser")
    public List<UserModel> getAllUser() {
        return userService.getAllUser();
    }

    @PostMapping("/insertuser")
    public String insertUser(@RequestBody UserModel user) {
        return userService.insertUser(user);
    }

    @DeleteMapping("/deleteuser/{id}")
    public String deleteUser(@PathVariable Integer id) {
        return userService.deleteUser(id);
    }

    @DeleteMapping("/deleteuser")
    public String deleteUserParam(@RequestParam Integer id) {
        return userService.deleteUser(id);
    }

    @PutMapping("/updateuser/{id}")
    public String updateUser(@PathVariable Integer id, @RequestBody UserModel updateUser) {
        return userService.updateUser(updateUser, id);
    }
}
🔖 Common Spring Annotations Explained
| Annotation | Purpose |
|---|---|
@SpringBootApplication | Marks the main class and auto-configures everything. |
@Entity | Marks a class as a JPA Entity (i.e., a table). |
@Id | Declares the primary key. |
@GeneratedValue | Auto-generates the primary key. |
@Repository | Marks a class as a DAO component (optional when using JpaRepository). |
@Service | Denotes a service layer bean. |
@RestController | Marks a controller that returns data (not views). |
@Autowired | Automatically injects dependencies. |
@RequestBody | Binds the body of a request to a method parameter. |
@PathVariable | Binds a URI variable to a method parameter. |
@RequestParam | Binds query parameters from URL. |
🧪 Testing
- Run the Spring Boot app (mvn spring-boot:run or your IDE’s run button).
- Open Postman or your browser.
- Try endpoints like:
- GET http://localhost:8080/alluser
- POST http://localhost:8080/insertuser with JSON body
- PUT
/updateuser/{id} - DELETE
/deleteuser/{id}
- Or open the H2 console at http://localhost:8080/h2-console using:
- JDBC URL:
jdbc:h2:mem:user_db - User:
sa - Password:
password
- JDBC URL:
Update 2023: I’ve started using ResponseEntity for returning HTTP responses with customizable status codes and more flexibility.
Returning raw String responses works, but ResponseEntity gives more control:
@PostMapping("/insertuser")
public ResponseEntity<String> insertUser(@RequestBody UserModel user) {
    try {
        userService.insertUser(user);
        return ResponseEntity.status(HttpStatus.CREATED).body("Successfully Inserted");
    } catch (Exception e) {
        return ResponseEntity.status(HttpStatus.INTERNAL_SERVER_ERROR).body("Error Inserting");
    }
}
You can also return JSON objects or even custom error structures this way.